Now retrieving an image set.
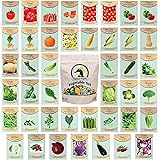
Land Guard 8ft Galvanized Raised Garden Bed Kit, Raised Garden Boxes Outdoor, Oval Metal Raised Garden Beds for Vegetables, Silver,108 Gallon Capacity(with 10 Connecting rods)
$39.99 (as of 12:59 GMT -05:00 - More infoProduct prices and availability are accurate as of the date/time indicated and are subject to change. Any price and availability information displayed on [relevant Amazon Site(s), as applicable] at the time of purchase will apply to the purchase of this product.)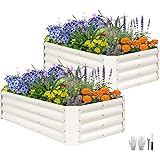
Now retrieving an image set.
ZORMY 2 Pcs 4x2x1ft Galvanized Raised Garden Bed Outdoor, Metal Planter Boxes with Easy Assembly, Planter Raised Beds for Gardening, Flower, Plants, Vegetable, Herb - White
$42.89 (as of 08:24 GMT -05:00 - More infoProduct prices and availability are accurate as of the date/time indicated and are subject to change. Any price and availability information displayed on [relevant Amazon Site(s), as applicable] at the time of purchase will apply to the purchase of this product.)Step 1: Choose the Right Location
Consider Sunlight Exposure
When it comes to starting your backyard orchard, the first step has gotta be finding the perfect spot. I can’t stress enough how important sunlight is for fruit trees. Ideally, you want at least six to eight hours of direct sunlight daily. So grab a cup of coffee, go outside, and watch how the sun moves across your yard throughout the day.
Also, consider the shade from nearby structures or trees. You might love that big oak tree for its beauty, but it might cast shadows that could block sunlight from reaching your budding orchard. Trust me, your fruits are gonna need all the warmth they can get!
I remember my first orchard attempt where I planted near a fence. Big mistake! I lost some precious fruit years waiting for them to get enough sun. So take your time surveying the right spot, because a little planning now pays off big later!
Drainage Is Key
Next up, think about drainage. You don’t want your trees sitting in waterlogged soil. Poor drainage can lead to root rot, which is a surefire way to kill your trees. If your yard tends to hold water after it rains, consider raising your planting area or planting in mounds.
I learned the hard way by planting a couple of trees in a low-lying spot. They struggled and never really flourished. My thumbs weren’t as green then, but I’ve since figured out that well-draining soil is essential for happy, healthy trees.
To test your soil, dig a hole about a foot deep. Fill it with water and see how long it takes to drain. If it hangs around more than a few hours, you need to improve your drainage before planting.
Think About Accessibility
Lastly, don’t forget about accessibility! Your orchard’s location should be easy to reach. Whether you’re watering, pruning, or just snacking on fruit, you don’t want a trek through thick bushes or a muddy field. I recommend mapping out pathways to your trees that’ll ensure you can dodge the weeds and get to your goodies with ease.
Last summer, I had to do a little dance with my hoses and the trees because I didn’t plan for easy access. Trust me, having a clear path will save you a lot of time and frustration!
And remember, planting in rows with some space in between will also make it easier to care for each tree. Consider how you’ll maintain them in the long run!
Step 2: Selecting the Right Fruit Trees
Choosing Categories of Fruit
Now it’s time to get into the fun part – selecting your trees! Think about what you and your family love to eat. Do you dream of biting into juicy apples or rich peaches? Or maybe a citrus splash is more your style. Choose trees that fit your climate zone to ensure they thrive!
When I started my orchard, I went all-in and planted fruits I thought would be exciting. But I soon realized that not every variety thrives where I live. Research what fruits do well in your specific region, and choose wisely!
Also, think about the size of the trees. Dwarf varieties are fantastic if you’re short on space or if you prefer to keep it manageable. They’re easier to harvest, and you can often grow more in a smaller area.
Pollination Needs
Don’t forget about pollination! Some trees need a buddy nearby to help them produce fruit. I’ve made the mistake of planting a single apple tree in isolation, only to find out it didn’t produce a thing because it lacked a pollinator. Make sure to plant compatible trees close together if they require pollination!
Check with local nurseries about the best companion trees to plant. It can make a huge difference in your orchard’s productivity. I learned that lesson quickly and have since expanded my variety to ensure a bustling pollination party every spring.
And a pro tip: when you’re buying trees, check their bloom times. If they bloom too close together, you’ll have a match made in heaven; if they bloom at different times, you may have a lonely tree sitting there for a long time!
Age and Size of Trees
When buying trees, you want to think about the age and size. Younger trees might take a while to bear fruit but can adapt better to your particular soil and climate. Older trees might give you fruit sooner, but they’re less likely to thrive if they’re not from your region.
I started with some older trees on sale, thinking I could get quick returns. But after a rough couple of years, I decided to invest in young trees from a reputable nursery. The results have been much better! They’re thriving and starting to bear fruit already.
Ultimately, your choice between age and size should reflect your goals for your orchard. Are you in a hurry to see fruit, or are you in it for the long haul? Finding the right balance is key!
Step 3: Soil Preparation
Testing Your Soil
Now that you’ve got your location and trees picked out, it’s time to get your hands dirty with soil prep. Trust me, the state of your soil can make or break your orchard! Start with a soil test. You can get a kit from a local garden center or send a sample to your state’s agricultural extension service.
Through trial and error, I learned that alkaline or acidic levels can affect tree growth. If your soil is off-balance, it could mean disappointing fruit yields down the line. Having the results will help you determine the right amendments needed.
Plus, if you have clay soil like I do, tests will help you understand how to amend it properly to allow for better drainage and root growth. A little prep work goes a long way!
Amending the Soil
Once you get your soil tests back, it can sound complicated, but don’t stress! If your pH needs adjusting or your nutrients are lacking, you can easily amend it. Adding organic matter, such as compost or aged manure, can vastly improve soil quality.
In my experience, building healthy soil is like laying a solid foundation for a house – it sets you up for success. I’ve added compost each year, and I can totally vouch for the difference it’s made!
Don’t skimp on this step—healthy soil leads to thriving trees. And you’ll be rewarded with juicy fruits bursting with flavor. I mean who doesn’t want that?
Tilling and Leveling
Before you plant, it’s best to till and level the soil. This helps break up any remaining clumps and gives your tree roots plenty of room to spread. I’ve found that just using a garden fork or rototiller can do wonders. It feels satisfying to work the soil and really get it ready for planting.
Get a free subscription to PREPARE – with more gardening and homesteading tips!
Make sure the ground is even, too. You wouldn’t want water pooling in one spot after a rainstorm. If you’re adding mulch or making mounds, ensure they are well-distributed so every tree gets good drainage.
Tilling the soil also incorporates any amendments you added, ensuring that your trees will access those nutrients right away. It’s a little extra elbow grease, but it pays off in the long run!
Step 4: Planting Your Trees
Timing Your Planting
Timing is everything when it comes to planting. I’ve made the mistake of planting too early and losing my trees to late frost. The best time to plant is usually in early spring or fall, depending on your region, so keep an eye on that forecast!
I like to mark my calendar with potential planting dates so I don’t forget. Timing your planting perfectly will lead to less stress and more success as your trees start to grow!
Also, check your local gardening calendars. They often have valuable tips on the best times to plant in your area. Trust me, it’s worth looking into!
Proper Spacing
When planting your trees, don’t forget to give them room to breathe! Spacing is crucial for good air circulation and sunlight penetration. I once planted too closely and learned how they all fought for resources. It wasn’t pretty; some struggling trees were completely choked out!
A good rule of thumb is to check how big your trees will grow and allow space accordingly. Most resources say about eight to ten feet apart for standard trees, and less for dwarfs. Just measure it out before you dig!
Think of it as giving them room to grow and thrive—if they’re squeezed too tightly, they can’t reach their full potential. And we’re all about that sweet, juicy fruit, right?
Follow Planting Guidelines
In summary, when it’s time to dig that hole, make sure you’re doing it right! You want to dig a hole that’s twice as wide as the root ball and just deep enough so the graft line is at or slightly above the soil level.
I’ve seen too many folks plant too deep, and it can lead to all kinds of problems with roots and moisture. So be a little precise on this one: just like how you want your pizza slice perfectly cut, you want your trees to be planted just right!
Water them well right after planting, and mulching around the base gives them an extra boost. It’ll keep the weeds at bay and help retain moisture. It’s like laying down a cozy blanket for your new trees!
Step 5: Caring for Your Orchard
Watering Wisely
Now that your trees are in the ground, it’s time to get serious about care. Watering is one of the most critical aspects, especially in those first few years. I always keep a close eye on how much rain I’m getting and if the soil feels dry, I water deep—this promotes strong root growth.
A general rule of thumb is to give young trees about an inch of water per week. But it’s good to check your trees regularly, especially during hot dry spells. Nothing like a wilted tree to give you a heart attack!
And remember, less frequent deep watering is better than shallow, frequent watering. That’s how they develop robust root systems that can reach down for moisture. I’ve been amazed at how much stronger my trees have become when I followed this method!
Pruning Techniques
One aspect I initially found intimidating was pruning, but it’s essential for growing healthy trees. Pruning helps maintain shape and health by removing dead or diseased branches. It might sound harsh, but it encourages better air circulation and sunlight in the canopy.
I usually prune in late winter when the trees are dormant. There’s something satisfying about those snips! Just make sure you’ve got the right tools, like sharp pruning shears, to make clean cuts. No saws needed here!
Over time, you’ll learn to see your tree’s structure and understand what needs to be trimmed. It’s like giving your tree the best haircut ever—well, in a way anyway!
Pest and Disease Management
Keep an eye out for pests and diseases. Early detection can save your orchard. I keep a close eye on leaves for discoloration or weird-looking growth, as these can signal trouble.
Invest in some organic pesticides and learn about Integrated Pest Management (IPM) techniques. You don’t have to go all chemical; there are plenty of natural solutions to help protect your babies!
Plus, a good practice is to maintain clean areas around your trees: clear away fallen leaves and debris that can harbor pests or pathogens. This small step makes a world of difference!
FAQs about Creating a Backyard Orchard
1. What is the best time of year to start planting my orchard?
The best time to plant your fruit trees is generally in early spring or late fall. This timing allows the roots to establish before summer hits or before winter comes in full force.
2. How much space should I leave between my trees?
For standard trees, it’s best to leave about 8-10 feet between each tree. If you’re planting dwarf varieties, you can get away with about 5-8 feet apart.
3. Do I need special tools to plant and care for my orchard?
While you don’t need a lot, having basic gardening tools such as a spade, hand trowel, pruning shears, and a watering can or hose will make your life easier when planting and maintaining your orchard.
4. How can I tell if my soil is suitable for planting trees?
Conducting a soil test is the best way to check. It will provide information on pH levels and nutrient content. You can find soil test kits at garden centers or send samples to your local agriculture extension office!
5. What are some common pests I should watch for?
Common pests include aphids, spider mites, and various fruit tree borers. Keep an eye on your trees regularly, and if you notice anything unusual, it’s time to act before they cause serious damage!
Get a free subscription to PREPARE – with more gardening and homesteading tips!
Related Content
- Around the House: New green housing technology is on the way
- How to Start a Small Vegetable Garden: 7 Expert Tips for 2025 Success
- Foodcycler pilot approved for 100 South Dundas households | Cornwall Standard-Freeholder
- Organic Horticulture Tips And Tricks For Your Garden
- Loveland leads Colorado municipalities in residential recycling